Designing E-Learning 3.0 in gRSShopper - 2
E-Learning 3.0 - Part 1 - Part 2 - Part 3 - Part 4 - Part 5 - Part 6 - Part 7 - Part 8 - Part 9 - Part 10 - Part 11 - Part 12 - Part 13
In the previous segment I decided to create a course with modules and sections, and set up the modules. I'll fill out the actual content of those modules over time. But now I need to stance face-to-face with something I've been dreading...
Events
I had a colleague tell me a few years ago that "calendars are solved" and that it was therefore of no interest to work on them. Then why won't Outlook and Google Calendar talk with each other? I asked. Suffice to say they're not completely solved.
But it's also true that nobody wants to use the course calendar. People have their own calendars, and the course calendar has to work with those. So there's a requirement to make it easy both to import and export event data, and while it has been solved by a lot of people in a lot of places, it's still a pain to work with.
In gRSShopper as I write now there is a predefined 'event' table, but the form isn't defined as well as I would like, and reflects my previous efforts to work in a useful way with events. So let's solve this thing. Here's the 'event' table as it looks now in the Form Editor:
 | |
| Figure 10 - Events table. |
 |
| Figure 11 - Form Editor - Event |
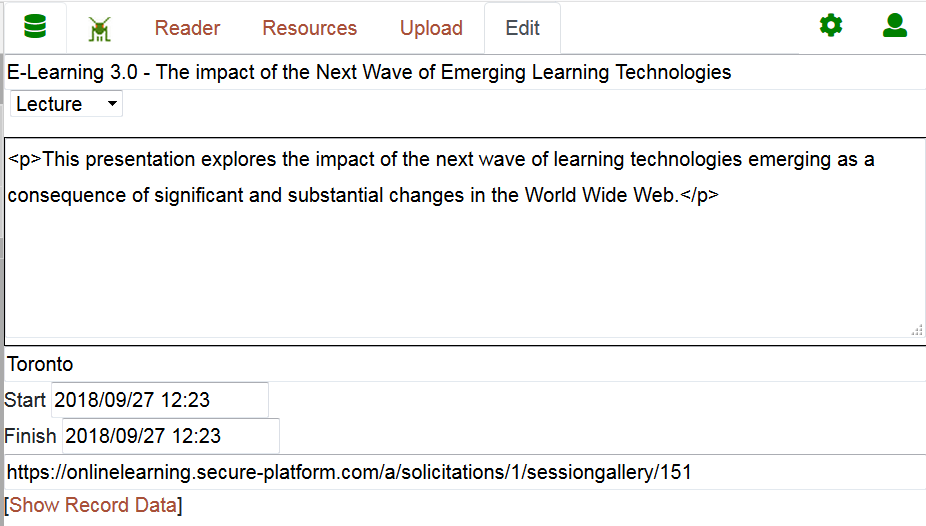
And my new form:
 |
| Figure 12 - Event Editor |
I'm not sure I have the 'datetime' type done yet, while I know I have 'date' done - something to check. (Update - I had to update the code for this. This took me far longer than it should have because I kept running into errors. 24 hours later, the errors turn out to be due to failing (sloppily) to ensure my JQuery calls were prefaced with document.ready() statements.)
Also, 'location' is just a text field. If I were thinking about normal form I would actually use a 'place' or 'location' table and define the locations, but I'm not even sure there will be locations, since the events are online. Or, maybe some people will create Meet-Ups that I should add to the events list. I don't know yet. So I won't define it ahead of time.
OK, let's try making an event:
 |
| Figure 13 - Completed Event Form, Edit and Resources tabs |
Thus far I've made a lot of progress creating and filling forms, but there isn't really anything for people to look at yet. The best way to give people something to look at is to use a page.
So I'll make a page I'll provisionally call 'Course Outline'. The Page Editor is already defined (and even has Help so I won't review how it all works here). So I'll open it up.
The main thing I'm interested in right now is the big box labeled 'Page code'. This is where I define the content of the page to be displayed to the reader. What I want to do is list the course modules and events (there's only one course so I don't need to list courses). I do this using a keyword command (you can see all the page commands here).
Here are the keyword command instructions:
keyword xxx    Keyword command; xxx = commands:
   db=ddd     select records from ddd database
   expires=nnn;     do not display records older than nnn seconds
   number=nn     display no more than nn records
   sort=xx     sort on field xx
   sort=xx,yy     sort on field xx first, then yy second
   format=fff     format using the view ddd_fff
   lookup     create lookup from another table
So if I want to list some modules, I'll do this:
This will display all the modules, sorting them according to their module number. The format will default to HTML, and I'll want to change that, but I'll test this first. I enter the code into the form (it autosaves, so I never need to click save). Then I go to the preview tab.
(Pause)
OK, that didn't work. A couple of things. First, here is the error I got:
Here's why. The actual preview URL is https://el30.mooc.ca/cgi-bin/page.cgi?page=226 but the preview window wants to show https://el30.mooc.ca/page/226 but it can't find it. What should happen is that a .htaccess file should redirect the URL. But the .htaccess file is probably missing. I'm always forgetting to put it in. :pNot Found
The requested URL /page/226 was not found on this server.
Additionally, a 404 Not Found error was encountered while trying to use an ErrorDocument to handle the request.
(I have to do a Google search on 'WinSCP show hidden files' to remember how to find hidden files like .htaccess -- ah, here it is.) So I edited it and loaded it in the main directory (on the to-do list is to make sure .htaccess is part of the out-of-the-box distribution). Here's what it looks like:
 |
| Figure 14 - .htaccess file |
 |
| Figure 15 - where are my modules? |
The problem is that gRSShopper doesn't know how to display modules. After all, I only created them yesterday.
What I need to do is to define a View that will display modules. So I'll select Create a New View in the left-hand window and open the View Editor. It's pretty boring; there's only two fields, 'View Title' and 'View Text'.
The title of the view is based on the table being displayed and the format it's being displayed in, like this: 'title_format'. (I used to have fancy dropdowns that let you select each and then would automatically create a title, but it ended up being a lot easier just to name the title directly). So for my module html view I'll use the title 'module_html'.
In the 'Text' field we define what we want to see. We can put in any command that works in a page, any HTML, any Javascript, indeed, pretty much anything at all. The View is an incredibly powerful tool (and can be used to break a lot of things, so be warned).
We can also insert any field from the record we're displaying using special commands. For example, if I want to insert the module title, I use the command: [*module_title*]
Notice that I'm using the full name of the field; this is because sometimes content from different tables blends into a single view and I want to keep it all straight. So let me define a pretty simple module view:
 |
| Figure 16 - View Editor - module HTML |
The
 |
| Figure 17 - Course Outline, first draft |
 |
| Figure 18 - keylist command |
I cheated a bit. I knew 'event_list' was already defined, so I just used that, just to test it out. I'll probably make a new view. Even so, we can see the result pretty clearly:
 |
| Figure 19 - Course Outline, second draft |
(You might be thinking - but wait, none of this is rocket science! I could have done this! Well - yes. But my own experience has been that it's never this easy to do any of this stuff, which is why I created gRSShopper (and again, now that I've done it once, I never have to do it again - I can apply these forms and events and modules and views to any course, any website, that I want.)
OK, let's set up the new Event view and while we're at it set up a page that will list all of the events in the course. First the view, which will include the description, event time and place. I'll call it event_outline.
 |
| Figure 20 - Events View |
 |
| Figure 21 - Page Editor - Events Page |
Notice the events page defines the sort to use the 'start' field. We won't see this in action in this post but it will be useful when we have more than one event.
And here's what the output looks like.
 |
| Figure 22 - Events Page Output |
Sure, it lacks styling, and could probably look better. But this is the basic idea. Since it's an online course I'm not concerned about the location (though maybe I should say 'Google Hangout' or 'Zoom' or whatever). The main thing is the link, which should take me directly to the event itself, launching the event viewer application, whatever it may be.
Done? Well, no. What about time zones? After all, people from around the world are taking this course. I could just put 'Eastern Standard Time' or whatever it is in October after the date, but that leaves the reader needing to figure it out for themselves. Not very convenient. What I'd like to be able to do is display it in the reader's local time.
Well, Javascript has a lot of date-time functions, which is what I'll use.
gRSShopper stores datetimes as 'epoch' dates. This is a single very large integer counting the number of seconds since January 1, 1970 UTC. So if I put [*event_start*] into the page code, gRSShopper will print out that number. We can use that as the input to a Javascript command. Javascript, however, inputs time in the number of milliseconds since January 1, 1970 UTC. So we need to add some zeros to the end. So here's how we get the datetime into Javascript:
var event = new Date([*event_start*]000);
Once the date is in Javascript, we can print it out as a local date:
document.write(event.toString());
So here's our newly defined view:
 |
| Figure 23 - Event view with Javascript-defined date |
And here's the output:
 |
| Figure 24 - Event listing with date-time in the local time zone |
Ah, but we're not done. How do we get it from here into someone's calendar? Because, as I said, people won't typically use their gRSShopper calendar - they'll use Outlook or Google Calendar or whatever.
What we want is one of those little links that allows people to click on a button and enter the event into their calendar. Those are easy to create, but there are services that will create them. Once such is AddEvent, which is what I'll use here. Following the instructions here I add their code to my event_outline view:
 | |
| Figure 25 - Event View with AddEvent Button Code |
date format=iso;time=[*event_start*]
This takes the epoch date specified by [*event_start*] and formats it as an ISO date string. There are other formats available: RFC822 (for RSS feeds), nice (for nice dates), and more. Also notice the use of the timezone command to insert the site's local time zone.
Here's the output:
 |
| Figure 26 - Event listing with AddEvent button |
And even better, now that I've done all this, you don't have to, because all you need to do is clone the course from the gRSShopper database and this will all work in your course on your instance of gRSShopper.
Like I said, I was dreading doing events. This whole thing, beginning to end (and including fixing scripts where needed, and writing this text and taking all the images), took me a good two days. It should be a lot easier for you now that I've run through the steps.
%20LinkedIn.png)
Comments
Post a Comment
Your comments will be moderated. Sorry, but it's not a nice world out there.