Designing E-Learning 3.0 in gRSShopper - 1
E-Learning 3.0 - Part 1 - Part 2 - Part 3 - Part 4 - Part 5 - Part 6 - Part 7 - Part 8 - Part 9 - Part 10 - Part 11 - Part 12 - Part 13
One of the fun things about working with software I wrote myself is that I get to try new things. For example, instead of creating a course simply by filling in boxes in predefined forms, I can think about the structure and format ahead of time and design it exactly how I want.
It would help if gRSShopper were a finished application. But it isn't, so from time to time I have to stop and code the right bits. This is a process that will probably never end. But it's far enough along now I can have some fun doing it.
Installing gRSShopper
gRSShopper is a web application that can be big and complex and difficult to learn. On the other hand, the completed version of the application with all the course elements created will be very easy to use and to learn. But I need to build all this. That's what these posts will address, as well as showing you how I'll design and create my course.
Until now, installing gRSShopper has been the hardest part of the process. But now it's pretty straightforward. I've created a one-hour video that shows me in real time installing gRSShopper at Reclaim Hosting.
Here's the video: https://www.youtube.com/watch?v=T8PFEEQJ8kw
Below, we'll begin by talking about the overall design, then we'll look at how to start creating that in gRSShopper. If you want more background before we get started, here's the gRSShopper website with instruction on some of the major elements.
The Overall Course Structure
I've decided to be really conservative here and set up the course as a ten-week (or so) course covering a series of topics. I've also decided that I want it to be able to export the course if I need to, so it needs to be reasonably consistent with other courses.
Ah, but what to call the pieces. I did a bit of searching around and determined that the overall structure is pretty common:
- course
- modules - an array of individual units of instruction
- sections - an array of individual offerings of the course
Like this:
 |
| Figure 1. From the University of Sussex - yes I know it's from 2012 but we can manage with that. I've looked at some more recent schemas and there isn't much difference between then and now. |
In gRSShopper you make a table by selecting Admin window (the gear icon, blue arrow), selecting the database tab (circled in blue) and then entering the name of the table in the field (highlighted in yellow). I'm making a module table so I typed 'module' in the form.
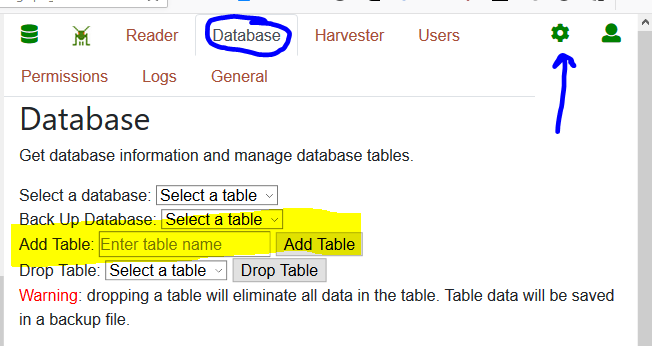 |
| Figure 2. Add a table in gRSShopper. |
This creates the table and gives me an option to edit the table, which I click. This take me to the Form Editor. It's just a big empty field, though, and I realize I haven't created any instructions for it. Um, OK then. First things first, I'll create a new page and create some instructions.
(Pause) OK, done that. Here are the instructions.
(Pause) Then I decided to make this a generalized help system for gRSShopper. Skip over this part if you're not interested. This is what I did:
- first, using the Form Editor, I created a new field for forms, called 'form_help', and then I added a 'form_help' field in the Form itself (read the documentation on the form editor for this (heh, recursion is recursive).
- then in grsshopper.pl, in main_window(), I added a default tab 'Help' if a value for 'form_help' exists for the form being displayed in the window.
- then I created a function called tab_Help() that looks for a page in the database with the same page_location as defined in form_help.
- the I added some script that would try to fetch the page from grsshopper.downes.ca if it's not available locally (I should change this to an API in the future so you don't get the header and index, but it works for now)
OK, back to building a module table. Let's define what I want in a module. This XML schema is a good starting point (remember, I can always add or change elements later if I want).
 |
| Figure 3. Sorry about the image of text; Blogger insisted on interpreting it as HTML. |
You might wonder why so many of these are 'int' fields (or 'integers'). This has to do with database normal form (DNF). The idea here is that you don't want to type the same information into a database in two different locations. So, eg., you wouldn't put the name of a 'groupmode' into the module, you would create a separate 'groupmode' table, put the names in there, and point to the index of the groupmode you want to use. This make a lot of sense, but it also results in long convoluted queries, so while I agree with the idea of DNF, I went a different way, associating everything with everything else using a graph.
Many of these tables are things that I don't deal with (like 'groupmode' so I'll ignore them. But the others are keys from important tables. For example, at the top of the table are fields for 'course' and 'instance'.Any time we have a field like that, we'll call it a 'keylist', and then in our form, we can easily link to the other table using a 'keylist' input (I do the same thing when I list the 'author' of a post).
We're looking at something like this:
 |
| Figure 4. Module Definition. From Moodle.org - and yes I know it's out of date; it's just an example. |
I think I can reduce all of this to its essence:
     name="id" type="int"
     name="course" type="int"
     name="section" type="int"
     name="added" type="int"
     name="score" type="int"
     name="visible" type="int"
Translating that to the gRSShopper forms format (I don't need to include ID because everything is given an id, creation date, and creator ID by default):
     tab:Edit;
     title,varchar,256;
     author,keylist;
     course,keylist;
     description,wysihtml5,40x20;
     tab:Upload;
     file,file;
I decided I didn't really need 'score' or 'visible', but I might add them later. I decided every module should have a description. I also allowed files to be uploaded and associated with the module. What's missing?
Minimally, each module should have one or more event. So I'll add that. I'll also associate the guests (as 'authors') with the module. And for external resources, I'll associate link posts with it. There might be more, but that's a start.
        tab:Edit;
        title,varchar,256;
        author,keylist;
        course,keylist;
        description,wysihtml5,40x20;
        event,keylist;
        author,keylist;
        tab:Upload;
        file,file;
        tab: Resources;
        post,keylist;
Here it is in the form editor:
 |
| Figure 5. Defining the module in the form editor. |
 |
| Figure 6. Defining the module table. |
Now to make a module. (I notice that 'Module' didn't show up in the 'Make' tab on the left hand pane. That's a bug; the pane should have reloaded when I added a new thing to list. Reloading gRSShopper fixed it, but it's annoying).
Here we are in the module editor.
 |
| Figure 7. Module editor. |
Now I'll go back to the Course Editor (I'll just click on 'Edit' next to the name of the course):
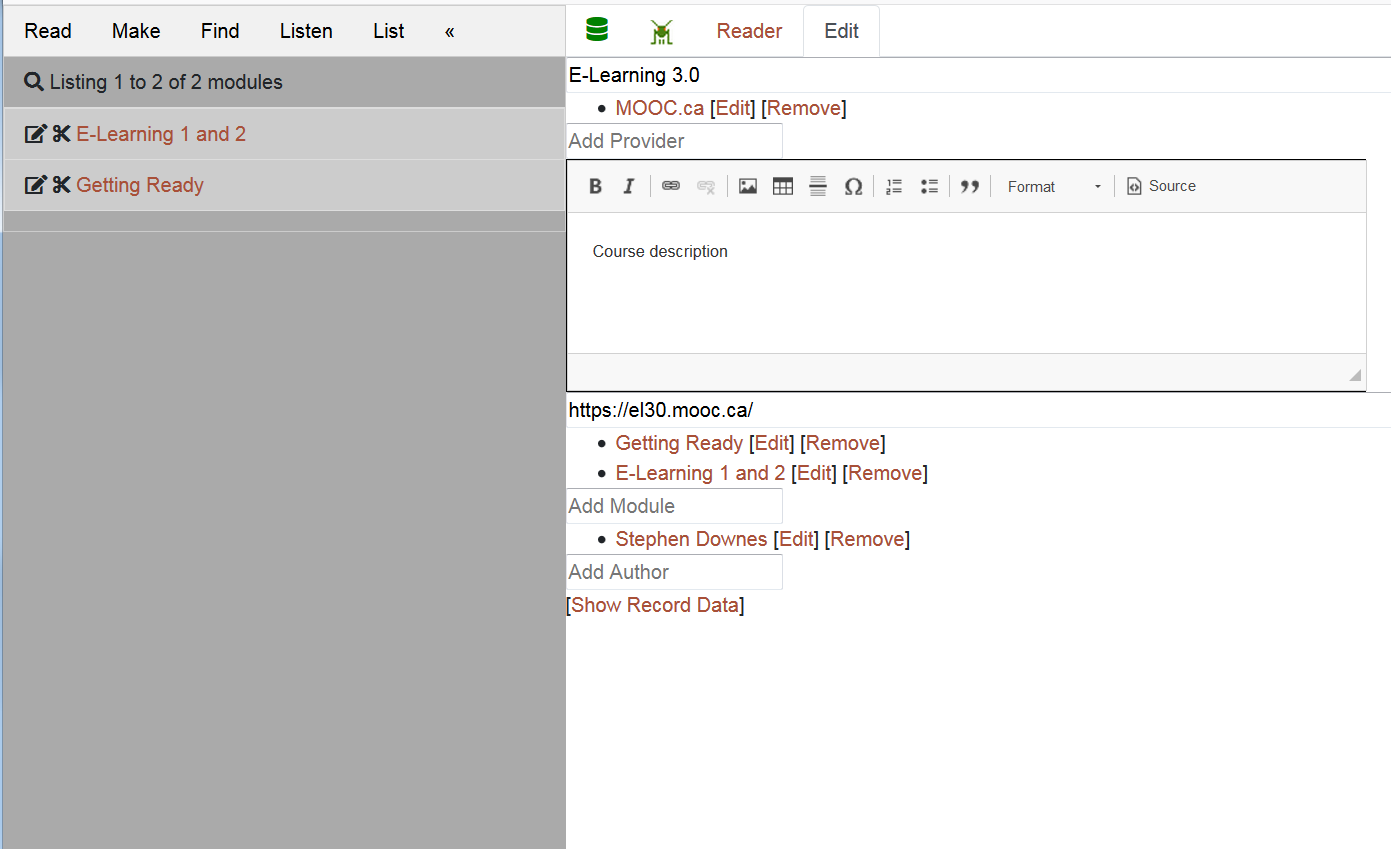 |
| Figure 8. Course Editor |
 |
| Figure 9. All Modules |
You might think that this is a lot of work just to set up a course with some modules. But my point here isn't to show that you have to do this, it's to show that you can do this. You're not locked in to the way an LMS defines a course. You define it yourself.
Also, now that I've created this course and these modules, they're done. You don't need to do all this. Anyone with their own gRSShopper instance can import them and use this as a template to create their own course. I'll show more about this in a future post.
%20LinkedIn.png)
Comments
Post a Comment
Your comments will be moderated. Sorry, but it's not a nice world out there.