How to Use Fastpages (2)
This is part two of a series. If you haven't read part one, you should do so now. Click here to read part one.
OK them welcome back. Let's begin by reviewing what we've done in part one, because it's not obvious.
First, we created a repository on GitHub. We did this by 'cloning' the original Fastpages repository. Then we updated the repository by 'merging' an automatically-generated 'pull request'. My version of the repository is located here, based on the name I gave it in part one: https://github.com/Downes/fastpages
You should make sure you can find your GitHub repository.
Second, the repository automatically generated a website for us using GitHub pages. The address is located at the bottom of your GitHub repository. My version of the website is located here, based on the name I gave the repository: https://Downes.github.io/fastpages/
It looks like this:
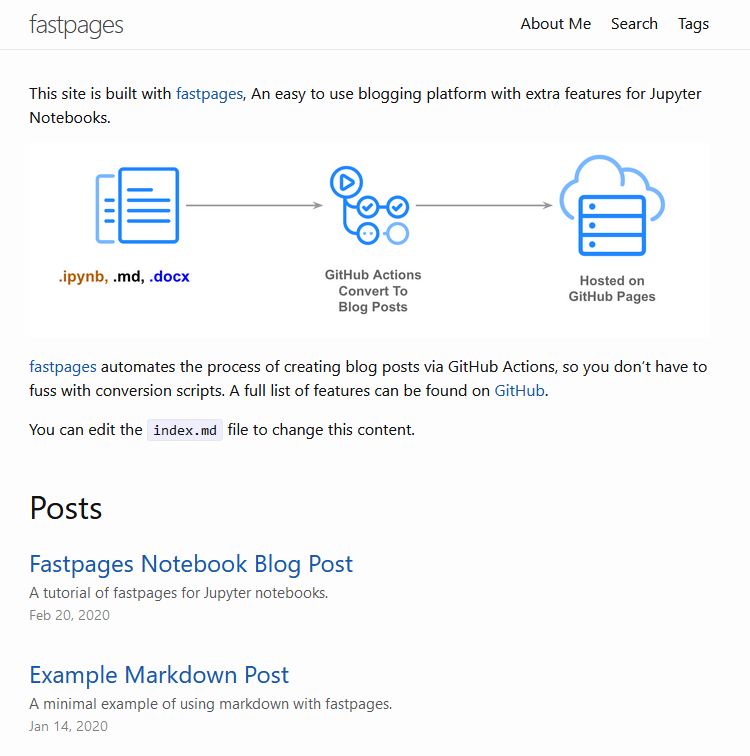
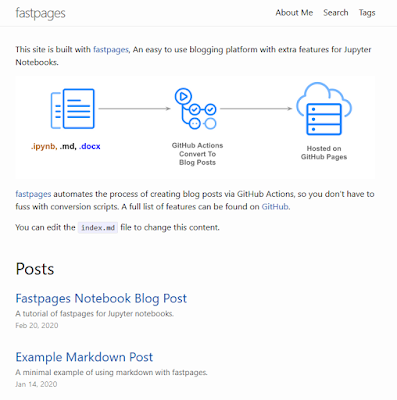 Your new website has been preloaded with an index page and two posts. It also has an 'About Me', 'Search' and 'Tags' page.
Find Your Pages
Let's find these pages. Go to the GitHub repository, as illustrated below. I've highlighted a file called
 The
The
Edit the Page Text
Click on the page title to open the display window:
 Then click on the edit button (I've highlighted it) to enter the editing window.
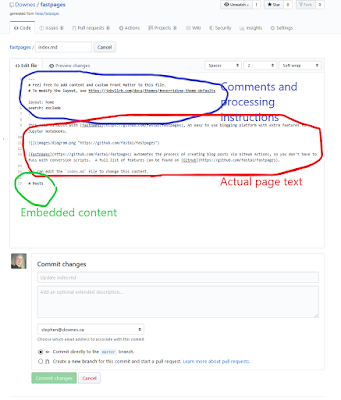 This is the editing window. You can see the page text in the big box at the top. I've highlighted three major areas:
- comments and processing instructions. These won't appear on the page, but will tell GitHub how to process the page.
- actual page text, in Markdown
- embedded content, from another directory
To edit the page text:
Note: if you go back to your index page on the website (for me, the page I see when I go to https://Downes.github.io/fastpages/ ) then you will not see the change right away. It takes a minute or two for the change you made to your repository to propagate to the website. Wait a few minutes, then go back to your page, and reload it, and you will see your changes.
Markdown
I don't want to write a Markdown tutorial here. What's important to remember is that GitHub pages uses a type of Markdown called 'Kramdown'. There is a guide to using Kramdown here: https://kramdown.gettalong.org/quickref.html
I encourage you to practice various elements of Kramdown on your index page until you're comfortable with it.
The Page Generation Process
We need to talk a bit about what happens when your website pages are generated from your repository. Recall this diagram from the previous post of this series:

Here it is again, with a bit of elaboration. Your repository is on the left. It feeds through a program called Jekyll running in GitHub Actions, and the output if your website on the right. All of this happens automatically (but it takes a few minutes, which is why you have to wait).
If you look at the GitHub Actions webpage you can see that there are many choice. What Fastpages does for us is to select and configure GitHub Actions in Jekyll.
This gives us more options in our Markdown pages. We can use the 'comments and processing instructions' section of the page to give Jekyll some instructions when it processes our page.
Processing Instructions
We have now reached the beginning of the instructions on the Fastpages website, here, in the section titled 'Front-Matter related options'. We will go directly to the section for Markdown:
These instructions go into the top of your Markdown file. These instructions are used by Jekyll to format the page. There's a detailed description of how to use them on the Jekyll website (sorry about the super-ugly formatting).
As the Fastpages documentation notes, the processing instructions are written in YAML (which stands for "Yet Another Markup Language" - there's a full description here). The main thing to keep in mind is that your title and summary should be inside quotation marks (if you want to use a quotation mark in the title itself, you need to escape it with a \ character. Like this: "Here is a title with a \"quotation\" mark in it."
Here is what the instructions do:
OK them welcome back. Let's begin by reviewing what we've done in part one, because it's not obvious.
First, we created a repository on GitHub. We did this by 'cloning' the original Fastpages repository. Then we updated the repository by 'merging' an automatically-generated 'pull request'. My version of the repository is located here, based on the name I gave it in part one: https://github.com/Downes/fastpages
You should make sure you can find your GitHub repository.
Second, the repository automatically generated a website for us using GitHub pages. The address is located at the bottom of your GitHub repository. My version of the website is located here, based on the name I gave the repository: https://Downes.github.io/fastpages/
It looks like this:
Find Your Pages
Let's find these pages. Go to the GitHub repository, as illustrated below. I've highlighted a file called
index.md - this is the index page for your website, which we just saw above.
.md extension stands for 'Markdown'. It's a way to design web pages that is easier to use than HTML. You can see the other pages in your repository as well, for example, about.md and search.html You can edit your page by clicking on the name of the page.Edit the Page Text
Click on the page title to open the display window:


- comments and processing instructions. These won't appear on the page, but will tell GitHub how to process the page.
- actual page text, in Markdown
- embedded content, from another directory
To edit the page text:
- Change the text as desired in the editing window (just the text circled in red, ignore the rest for now). As soon as you change some text you'll see the green 'Commit changes' button light up.
- (Optional) Describe your changes in the boxes above the green button. This is to tell you and other people why you made the change or what you changed.
- Click on the green 'Commit changes' button.
Note: if you go back to your index page on the website (for me, the page I see when I go to https://Downes.github.io/fastpages/ ) then you will not see the change right away. It takes a minute or two for the change you made to your repository to propagate to the website. Wait a few minutes, then go back to your page, and reload it, and you will see your changes.
Markdown
I don't want to write a Markdown tutorial here. What's important to remember is that GitHub pages uses a type of Markdown called 'Kramdown'. There is a guide to using Kramdown here: https://kramdown.gettalong.org/quickref.html
I encourage you to practice various elements of Kramdown on your index page until you're comfortable with it.
The Page Generation Process
We need to talk a bit about what happens when your website pages are generated from your repository. Recall this diagram from the previous post of this series:

If you look at the GitHub Actions webpage you can see that there are many choice. What Fastpages does for us is to select and configure GitHub Actions in Jekyll.
This gives us more options in our Markdown pages. We can use the 'comments and processing instructions' section of the page to give Jekyll some instructions when it processes our page.
Processing Instructions
We have now reached the beginning of the instructions on the Fastpages website, here, in the section titled 'Front-Matter related options'. We will go directly to the section for Markdown:
---
- title: "My Title"
- summary: "Awesome summary"
- toc: false
- branch: master
- badges: true
- comments: true
- image: images/some_folder/your_image.png
- categories: [fastpages, jupyter]
- metadata_key1: metadata_value1
- metadata_key2: metadata_value2
---
These instructions go into the top of your Markdown file. These instructions are used by Jekyll to format the page. There's a detailed description of how to use them on the Jekyll website (sorry about the super-ugly formatting).
As the Fastpages documentation notes, the processing instructions are written in YAML (which stands for "Yet Another Markup Language" - there's a full description here). The main thing to keep in mind is that your title and summary should be inside quotation marks (if you want to use a quotation mark in the title itself, you need to escape it with a \ character. Like this: "Here is a title with a \"quotation\" mark in it."
Here is what the instructions do:
- title and summary - create a page title and page summary (these won't show up on the page but will be defined in the page header and used by search engines)
- toc - this creates a table of contents for the page based on headings used in the page (which are defined using Markdown).
- branch and badges - don't do anything in markdown, so just delete them
- comments - enables comments using a program called Utterances - this is a whole separate topic so we won't cover it here.
- categories and metadata - creates additional page information that can be processed by Jekyll; for example, the 'categories' can be used to create tags for the pages.
%20LinkedIn.png)
Comments
Post a Comment
Your comments will be moderated. Sorry, but it's not a nice world out there.